Preamble: the mechanism described here is an alternative of the classic deployment steps described here and here.
The Pelican documentation is awesome, if you read it carefully. The Tips section contains information about how to deploy with GitHub Actions.
Sounds cool, but what is it exactly?
GitHub introduced GitHub Actions in 2019, and it's a workflow automation tool that allows GitHub users to build their Continuous Delivery pipelines. Basically a workflow pipeline à la Jenkins/GitLab. OK.
After reading about it I decided to give it a try, to see if I can automate the deployment of my humble blog and spare a few manual steps.
The GitHub actions file is stored in a directory called .github/workflows. It's a yaml file defining the different steps of your workflow with a declarative syntax.
Normally you would need to tell GitHub to pick an Ubuntu image, install python, pip and Pelican, checkout your Pelican blog files, run the pelican command and deploy to your GitHub Pages... And the amazing Pelican team already provides a workflow that does all the work for you!
Pelican's github_pages.yml :
name: Deploy to GitHub Pages
on:
  workflow_call:
    inputs:
    settings:
        required: true
        description: "The path to your Pelican settings file (`pelican`'s `--settings` option), for example: 'publishconf.py'"
        type: string
    requirements:
        required: false
        default: "pelican"
        description: "The Python requirements to install, for example to enable markdown and typogrify use: 'pelican[markdown] typogrify' or if you have a requirements file use: '-r requirements.txt'"
        type: string
    output-path:
        required: false
        default: "output/"
        description: "Where to output the generated files (`pelican`'s `--output` option)"
        type: string
permissions:
    contents: read
    pages: write
    id-token: write
    concurrency:
    group: "pages"
    cancel-in-progress: false
jobs:
  build:
    runs-on: ubuntu-latest
    steps:
    - name: Checkout
        uses: actions/checkout@v4
    - name: Set up Python
        uses: actions/setup-python@v4
        with:
        python-version: "3.11"
    - name: Configure GitHub Pages
        id: pages
        uses: actions/configure-pages@v3
    - name: Install requirements
        run: pip install ${{ inputs.requirements }}
    - name: Build Pelican site
        run: |
        pelican \
            --settings "${{ inputs.settings }}" \
            --extra-settings SITEURL='"${{ steps.pages.outputs.base_url }}"' \
            --output "${{ inputs.output-path }}"
    - name: Fix permissions
        run: |
        chmod -c -R +rX "${{ inputs.output-path }}" | while read line; do
            echo "::warning title=Invalid file permissions automatically fixed::$line"
        done
    - name: Upload artifact
        uses: actions/upload-pages-artifact@v2
        with:
        path: ${{ inputs.output-path }}
  deploy:
    environment:
        name: github-pages
        url: ${{ steps.deployment.outputs.page_url }}
    runs-on: ubuntu-latest
    needs: build
    steps:
        - name: Deploy to GitHub Pages
        id: deployment
        uses: actions/deploy-pages@v2
As you can see, this Actions file calls other Actions:
checkoutsetup-pythonupload-pages-artifactdeploy-pages
mixed with various scripts to build the static site and change the permissions on the output files.
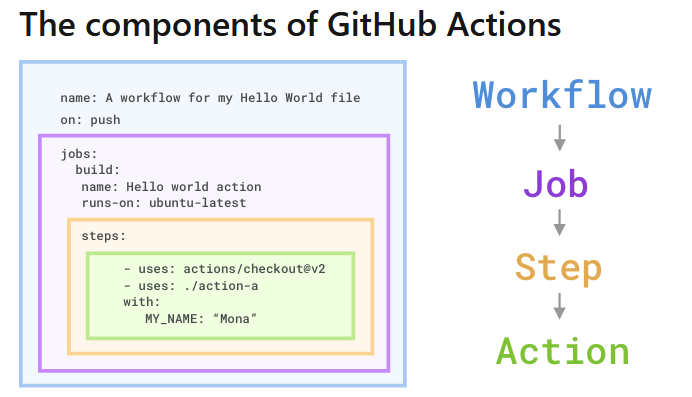
This online training gives some info about the action syntax and contains this great drawing explaining the file structure:

You can call the Pelican workflow in your yaml file, see below the line:
uses: "getpelican/pelican/.github/workflows/github_pages.yml@master"
name: Deploy to GitHub Pages
on:
    push:
        branches: ["master"]
    workflow_dispatch:
jobs:
    deploy:
        uses: "getpelican/pelican/.github/workflows/github_pages.yml@master"
        permissions:
            contents: "read"
            pages: "write"
            id-token: "write"
        with:
            settings: "publishconf.py"
            requirements: "pelican[markdown] pelican-liquid-tags pelican-sitemap"
So thanks to that mechanism, my GitHub Action file ends up being very simple.
I pushed my yaml file to my master repository. Now every time I push new files in my master branch (the one containing the .md files and the pelican settings), the workflow is triggered and after a couple of minutes, I see the new version of my blog online!
If I ever want to see live the action being triggered, I need to go to the Actions tab in my repo (https://github.com/username/repository/actions) and there I can see a Deploy to GitHub Pages action running, with the commit message I entered when I committed the .md files changes.
Pretty cool enhancement!

